Table of contents
- Getting Query Id and Token
- Start creating new Flex Query Report
- Configure “Cash Transactions”
- Configure “Trades”
- Configure “Forex Balances”
- Fill “Delivery Configurations” and “General Configuration”
- Get and save the Query ID
- Go to Flex Web Services settings
- Enable Flex Web Services
- Save the Current Token
- Enter the Flex Query ID and Token to Portfellow
Getting Query Id and Token
- Go to Interactive Brokers homepage
- Click “Log in” and then click “Portal Login”
- Go to Flex Queries page
- From the menu choose: Reporting -> Flex Queries

Start creating new Flex Query Report
- Click on the “+” icon, to start configuring the report

Configure “Cash Transactions”
- From the “Sections” list, click on the “Cash Transactions”.
- Choose all options, except Summary
- Click “Select All” to select all fields
- Click “Save”

Configure “Trades”
- From the “Sections” list, click on the “Trades”.
- Choose only “Execution”
- Click “Select All” to select all fields
- Click “Save”

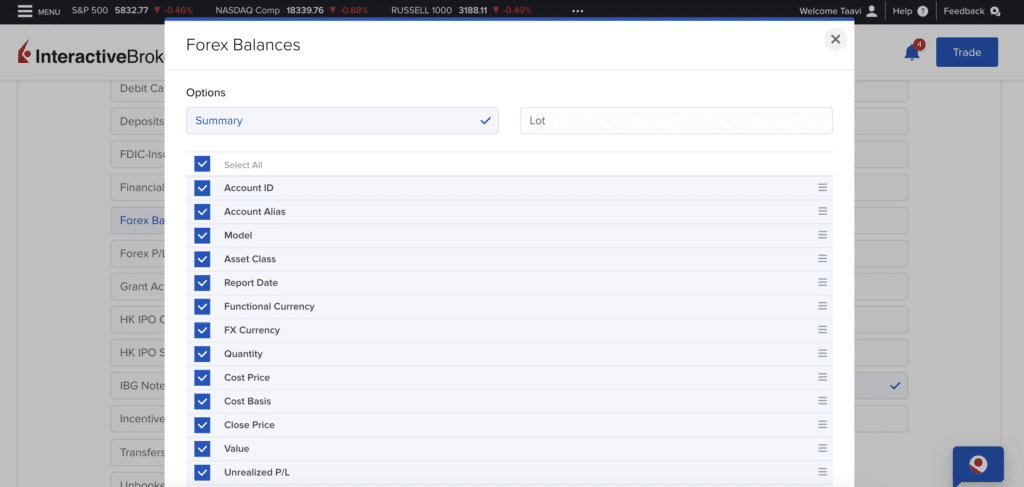
Configure “Forex Balances”
- From the “Sections” list, click on the “Forex Balances”.
- Choose only “Summary”
- Click “Select All” to select all fields
- Click “Save”

Fill “Delivery Configurations” and “General Configuration”
- Choose format “XML”
- Choose period “Last 30 Calendar Days”
- Set Date Format: yyyy-MM-dd
- Set Time Format: HH:mm:ss
- Set Date/Time Separator: ; (semi-colon)
- Set all other options: “No”
- Click “Save”

Get and save the Query ID
- From the report list, click on the name of the created report and there you can see field Query ID. Copy the number to Portfellow.

Go to Flex Web Services settings
- From the “Flex Queries page” click on the cog icon next to the “Flex Web Service Configuration”.

Enable Flex Web Services
- On the new window tick the “Flex Web Services Status” checkbox
- Choose 1 Year
- Leave the IP address field empty
- Click Generate New Token
- Click “Save” if needed

Save the Current Token
- If the Activation Period is too short, you can click on the “Generate New Token” field and choose 1 year expiry time. You need to click this button also to generate a new token, when previous one expires in about 1 year.
- Copy “Current Token” field for Portfellow.
